Fresh Milled 100% Ancient Grain Sourdough Bread
Light crusty exterior with the perfect soft chewy bite on the inside, this is my favorite nutrient dense sourdough bread made entirely with freshly milled spelt and khorasan wheat berries.
Ingredients
Levain (Starter Feeding):
- 25 grams sourdough starter
- 50 grams filtered water
- 50 grams flour of choice
Main Dough:
- 100 grams active starter 100 g from above levain and 25 g to put back in the fridge to reserve for next time you want to bake.
- 375 grams filtered water 75% hydration
- 1 tbsp oil I use avocado oil. (14 grams)
- 250 grams fresh milled spelt flour
- 250 grams fresh milled khorasan flour (aka Kamut)
- 13 grams sea salt
Instructions
Feed your starter the night before you want to bake.
- Mix about 25 grams of leftover sourdough starter (from the fridge) with 50 grams of filtered water and 50 grams of fresh flour. Stir until well combined.
- Transfer to a clean jar and cover. Mark the top of the starter with a rubber band to see how much it rises overnight (6-12 hours). You want your starter to double in size.
In the morning, mix up your dough.
- The next morning your starter should be bubbly, active, and doubled-in-size. It's ready to mix into your dough. Using a scale, place 100 grams of your starter into a large mixing bowl. Transfer the remaining 25 grams of starter to the fridge to use for next time.
- Add the 250 grams of spelt berries and 250 grams of khorasan (kamut) berries to your grain mill and grind into flour.
- While your berries are milling, mix the 375 grams of filtered water and the 14 grams of oil (1 tbls) into the 100 grams of starter.
- Using a danish dough hook, your hands, or a spoon, thoroughly stir your freshly milled flour and 13 grams of sea salt into the bowl of starter, water, and oil until no dry bits of flour remain.
- Cover the bowl and let the dough rest for 30 minutes. This half hour rest is called fermentolyse (a form of autolyse) that will allow the flour to hydrate, making the dough easier to handle. Now that everything has been mixed together, bulk fermentation (the first rise) has officially begun!
Bulk Fermentation (First Rise)
- After the first 30 minute rest, give your dough its first set of "stretch and folds". Grab an edge of the dough, stretch it up and fold it over the top of the rest of the dough. Turn the bowl 1/4 and grab another edge of the dough and do the same thing. Turn the bowl 1/4, do the same thing, working your way around the dough until all edges have been stretched up and over the center. This process will smooth out the dough, developing a strong gluten network along the way.
- Cover the dough and allow to rest for 30 minutes.
- After the 30 minutes, give your dough its second set of stretch and folds followed by another 30 minute rest. Stretch the dough as far as you can while being careful not to stretch it to the point of tearing. Be gentle with the dough, as it is now beginning to form volume and structure.
- Give your dough its third and final set of stretch and folds. At this point, the dough should feel fairly smooth and elastic.
- After the stretch and folds, flip the dough over so that the smooth side is facing up in the bowl. I actually like to shape it into a nice ball on the counter and place it back into my bowl, but shaping it is not necessary. Cover and allow to rest for the remainder of the bulk fermentation. During this time, you want your dough to puff up and rise until just under double in size. This should take between 3½ to 5 hours, depending on the temperature of your kitchen.
Shaping the Dough
- Once your dough has finished its bulk fermentation, you can shape your dough. Prepare your banneton basket by sprinkling it generously with rice flour. Very lightly sprinkle your countertop with rice flour. You shouldn't need very much flour for this, as you will use the grippy surface for shaping. Too much flour and your dough will slide. Carefully guide your dough out of the bowl using a flexible bowl scraper, making sure the smooth side is on the counter and the sticky side is facing up.
- For a batard, using wet fingers, gently ease your dough into a rough rectangle, with the long side in front of you. Taking the corners, fold the left side over into the center (in thirds), followed by the right side, as if folding a letter. Then starting at the edge closest to you, roll up into a log. Tighten up the log by pulling the dough towards you, using the sticky underside to create tension. Then simply plop the log into your floured banneton, seam side up.
- For a boule, using wet hands, pull the edges of the dough into the center, being careful not to deflate the aerated dough. Gently flip the ball of dough over so that the sticky side is now underneath. Using the stickiness, cup your hands around the dough and pull into a tight ball.
- Place the shaped dough into your banneton that has been liberally dusted with rice flour. VERY IMPORTANT: Place the dough smooth side down, so your seam (sticky side) is on the top. This way, the top of your dough will get pretty lines from the banneton and won't split at the seam. Handle the dough as little as possible and be very gentle in order to preserve all the gasses and air bubbles that have formed during the bulk ferment.
Cold Proof/Fermentation (Second Rise)
- Now that your dough is in the banneton basket, cover it loosely with a plastic bag and place in the fridge overnight for a minimum of 5 hours, up to 36 hours. The longer the cold ferment, the more sour the flavor.
- In the summer when my home is warm, I find that the cold proof in the fridge overnight is too long for my very active dough! I typically take it out in the evening and bake before bed. I wrap the bread in a baker's couche and allow it to cool on the counter overnight. If you experience the same and need to do the overnight proof, you can try cutting back to 50 grams of starter, which will slow down fermentation.
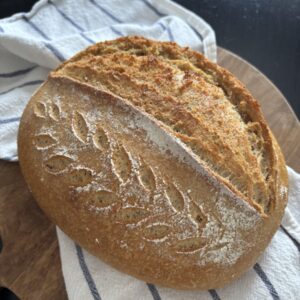
Scoring
- The next day, when you are ready to bake, preheat your oven to 450°F (232°C). Place your Dutch Oven into the oven when you turn it on and preheat for 45 minutes. Leave your dough in the fridge until the very last minute. Placing cold dough into a hot oven will give your bread great "spring"!
- About 45 minutes later, when your oven is preheated, take your sourdough out of the fridge and gently flip the dough out onto a piece of parchment paper or silicone bread sling. Your dough should now be seam side down. Smooth out any extra flour on your dough, and score your bread with a lame or clean razor blade. Try to score fairly deep (1/4 inch) at an angle to ensure the dough opens up.
Baking
- Carefully take your dutch oven out of the oven. Place the dough into the pot, parchment paper and all! I like to lift the dough by holding onto both sides of the parchment paper (or silicone bread sling) tightly. Put the lid on and place into the hot oven.
- Bake the bread for 30 minutes at 450°F (232°C) with the lid on. The lid traps steam around the dough, creating a great rise and beautiful crust. After 30 minutes of baking, take the lid off the Dutch Oven and admire your bread's oven spring! This is my favorite part! Continue baking with the lid off for an additional 5 minutes or until the bread has the color you want. Bread is fully baked when the internal temperature has reached 190-210°F (88-99°C). I always check the temp aiming for around 199°F to ensure it is cooked through and not gummy in the center but still moist and tasty.
- Remove the bread from the oven and let cool on a wire rack for at least one hour before slicing. Your bread is still setting, so resist the urge to cut into it earlier! Enjoy!